DIY – The World's Cheapest Watermaker.
by Ted Nobbs on 9 May 2007
DIY watermaker SW
We were in a Red Sea anchorage, sitting in a magnificent desert seascape, surrounded by a shore of wildly coloured sand, waiting for a gale to pass. Our American cruising friend Bob, on Yacht Aplysia, with his wife Steph have been cruising the world for many years now.
We were sitting on Blackwattle chatting, and the conversation came around to watermakers.
'How much does yours produce?' I asked.
'About 100 litres'
'Wow', I replied, 'We couldn't afford any such luxury – ours produces only 13 litres, but we get along okay.'
I remember Bob's laugh. 'Well, I made it my myself, and it cost very little – come on over this afternoon and I'll draw you a diagram, so you can make one too.'
I was doubtful. 'I'm not very mechanically minded,' I remarked, uncertainly.
'Well, it's actually very easy – you'll see.'
And that's how I came upon this remarkable invention.
For long range cruising, or even a three week holiday, we think a watermaker is an essential item on a boat. The commercial variety range in price from approximately US$3,500 to US$11,000 for a water production rate of 40 -140 litres an hour.
Bob tells me that this design has been passed around the long range cruising community for the past few years. It produces 100 litres per hour, for, with diligent buying, a cost of approximately US$2,000.
Apart from the cost savings, the other great thing about the design is that you can spread the component parts around the boat in any convenient location, some in the engine room, for instance – they don't have to be in one spot, taking up a lot of stowage room, as the commercial variety does.
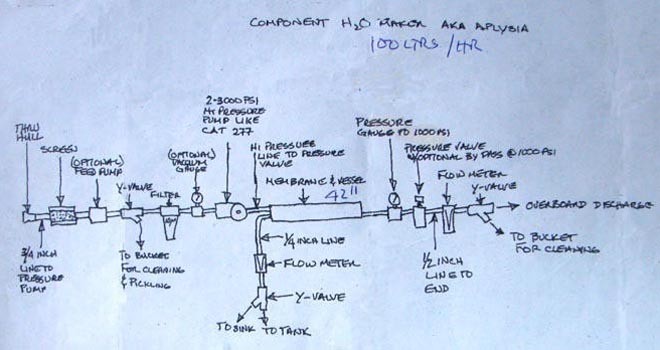
The diagram shown is a schematic. The parts are all commonplace and easy to obtain from most marine hardware suppliers. The diagram is self explanatory but the following is a quick run through of the component parts:
1.The thru' hull fitting should ideally be a dedicated three quarter inch fitting.
2.A sea strainer or screen connected to the hull fitting by a three quarter inch line, which will continue on to the pressure pump.
3.After the screen, which is intended to remove solids such as seaweed, is an optional feed pump, whose purpose is to ensure that airlocks do not occur in the system.
4.Following the feed pump is a Y-valve with a free tail, which is used for cleaning and pickling the system. This tail usually has a small filter on the bottom, and is inserted in a bucket with the pickling solution.
5.This is followed by a filter which should be a 20-30 micron filter. Some filter housings have a by-pass valve which allows you to eliminate the Y-valve and have the cleaning and pickling pipe going to this system directly.
6.The filter is followed by an optional vacuum gauge, followed by
7.A 1,500 psi high pressure pump, not 2-3000 psi as stated in the diagram, which will be run at 800 psi and can be either electrically or engine driven. CAT pumps are suitable for this purpose.
8.The membrane and pressure vessel, which in this case is a 42 inch long system, is connected to the pump by a high pressure line, which continues to the pressure valve
9.From the membrane, a quarter inch plastic line goes through a flow meter to a Y-valve which can be connected to the water tank for drinkable water, and optionally, to the sink.
10.From the other side of the membrane and pressure vessel connected by a high pressure line is a pressure gauge to 1,000 psi, followed by a
11.Pressure valve with optional bypass at 1,000psi.
12.From this valve, a quarter inch line continues through a flow meter and a
13.Y-valve which will discharge overboard, or to the cleaning bucket.
It is quite a simple unit to build, and with proper maintenance should give 100 litres per hour for many years,
My final comment is that, no matter what watermaker system you have, good care and maintenance is essential to ensuring long life and good drinkable product. . We have regularly cleaned the membrane with both alkaline washes and acid washes when necessary.
Whenever the watermaker is not going to be used for three days we have pickled it to ensure that algae growth does not occur on the membrane.
We have had our watermaker on the boat since 1995, and believe that the careful maintenance is the reason we have had very little trouble. We installed a new high pressure diverting valve this year, 2007.
Editor's Note: If you wish to print the diagram, click on the image below to achieve a larger size
If you want to link to this article then please use this URL: www.sail-world.com/33568