
Homebuild of new design of Lowrider International Moth
by John Butler 3 Apr 2020 03:14 PDT
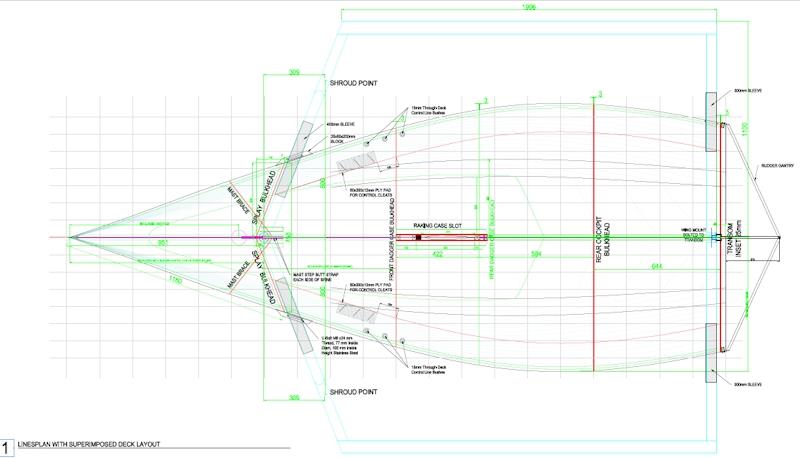
2020 sees a new design of Lowrider International Moth - stage 1 © John Butler
John Butler has been building a new Lowrider International Moth to his own design over the last six months. Very few Moths have been built without foils during the past ten years!
Some 50 years after buying my first International Moth, a Shelley Mk1, I decided that I needed
to join the Lowrider resurgence by designing a Moth suitable for my age (67) and weight.
Back in early 2019 I bought a licence for a piece of software called "3D Boat Design" and
started to discover what I could do with it, in order to come up with a hull shape that would carry
my 95kg weight.
Bearing in mind that the average Moth sailor is 70kg or less, and I was looking at designing a
displacement Lowrider rather than a flying Foiler, creating sufficient buoyancy to take my weight
was the main priority without dragging the transom. So the concept of "Ultra Fat B*****d" was
born, a reference to both the boat's beam and the girth of my waistline...
As a retired pensioner, my budget would not stretch to use of foam and carbon fibre in its
construction, and my understanding of the technology of laminating up a hull or components by
a vacuum-bagged method was non-existent, so I went back to basics from decades ago and
decided to build it in a developed 3mm plywood shape, using the "Stitch and Glue" method,
without a mould, in my garage.
To understand how to create the complex shape from tortured plywood required making a 1/5th scale model in 0.6mm modelling ply from plans extrapolated from the 3D virtual shape.
I started with scarfing together the main ply panels in mid-October 2019, fixing a single length
of western red cedar as a gunwhale each side, then using a couple of temporary 15mm ply bulkheads the darts at the rear were pulled together with copper wiring and tack epoxied together.
After joining the bow to midships panels with a second internal triangular piece of ply, laid cross-grain to the hog, the bow was pulled together and the boat shape was formed. Using a method learned from the Miracle dinghy build manual, bulkheads were located in their correct places using a tab and slot method.
The chines were taped with a 50mm Kevlar Aramid tape and epoxy after filleting internally with
microballoon filler, prior to the centre spine, daggerboard case and splay mast support bulkheads
being fitted.
As of the end of March the decks are all glued down, two coats of epoxy sealer applied, and
primed and painted with two-pot polyurethane. Epoxy sealing, filling and fairing of the outside of the hull is now ongoing.
With the design named the way it is, we are left wondering what the boat itself will be christened! Remember we want to hear YOUR stories of boat repairs, renovations and invention too.