
Steve Goodchild explains how to build a Stornoway 16 wooden dinghy with epoxy resin - Part 2
by Epoxycraft 18 Mar 2020 06:00 PDT
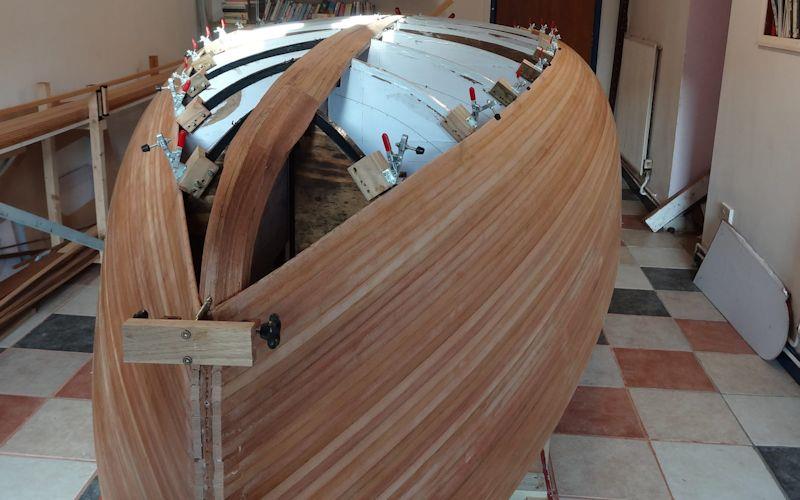
Building a Stornoway 16 wooden dinghy using West System epoxy resin © Steve Goodchild
Making the cedar strips and mast
As mentioned in part one of this series, to build the ideal boat with which to join the Dinghy Cruising Association, retired land surveyor Steve Goodchild bought the plans from designer Paul Fisher and assembled the 'strongback' jig on which 'Barnacle's' hull would be laid up. He then attended a WEST SYSTEM® epoxy course to learn how to get the best results when using epoxy.
"You don't build your own boat to save money," Steve explains. "You do it for the sheer satisfaction of the craftsmanship involved. For what I paid in raw materials I could have bought several second-hand boats, but where is the fun in that? This is a labour of love, and it gives me huge pleasure every time I see the result."
Although Steve is a competent woodworker he was new to fibreglass sheathing so it was time to get some training.
"I was a bit worried about the whole process of working with fibreglass cloth, as there was a lot that could go wrong," he says. "I therefore enrolled on WEST SYSTEM epoxy course at Wessex Resins, in Hampshire. The course content was comprehensive and the presentation informal, making it easy to ask questions. The students all got hands-on with the products and I found that working with fibreglass sheathing wasn't nearly as terrifying as I first thought. I also picked up some invaluable tips for bonding and filleting."
The image shows a typical course, with students getting hands-on with lay-up using glass fibre cloth, epoxy and peel ply.
Yellow or Western Red varieties of cedar are the recommended timbers for strip planking, so Steve searched for a local source. He quickly found one at Stone's Marine Timber at East Portlemouth in Devon.
"The quality of timber they supply is exceptional," Steve says. "The Red Cedar I bought was quarter sawn, straight, blemish free and - importantly - in lengths of 5.5metres (18 feet). As the finished boat is only 4.9 metres (16 feet) long, this will save the laborious task of scarfing strips together." Here the timber is being fed into a band saw which can be seen at the far end of the room.
To reduce the 25mm thick x 200mm wide planks down to the required 8.5mm thick and 20mm wide, Steve had to make up a series of feed-in and feed-out tables from scrap wood. He reduced the thickness of the planks with a small Record power planer.
These planks were cut using a table saw. The result was 144 strips of Cedar ready for routing.
Steve then introduced the matching coves and beads into which each plank would slot together.
"Routing the planks is simplicity itself, but there are three important things to remember," Steve advises. "Firstly, it is critical to get the curves exactly centred on the edge of the strip. Secondly, machine the convex curve before the concave one. This is because the concave face leaves feathered edges that are very delicate and easily damaged. Thirdly, to prevent break-out, I noted which way the grain ran. I then cut the strip so that the grain was running out of the timber rather than into it when it reached the cutter."
Because the edges were so fragile, Steve took care to stack each strip as it was cut, rather than simply making a pile to sort later.
"I was amazed how well they fitted together," he says. "If it wasn't for the difference in colour and grain, you would think it was one wide plank, as the photo shows."
The Mast
As the Solway 16 is a sailing dinghy, Steve needed to make the mast and spars. "I had never made a mast before, and I think I may have accidentally invented a completely new technique," he says. "I decided to strip-plank the mast, as the only plans I could find online were for round versions. I wanted mine to have an aerofoil section whilst also being tapered and raked. As luck would have it Hamish dug out a very comprehensive document that set me on my way."
Steve decided to make the mast out of Sitca Spruce, which is long grained and exceptionally strong, so has traditionally been the material of choice for wooden spars. Once again, Stone's Marine Timber in Devon were able to help by supplying a piece of clear (knot and void free) timber measuring 100mm x 150mm x 7500mm.
"I decided to taper the mast above the 'hounds' (the wider part of a mast where the crosstrees/spreaders rest) both laterally and forward to create a parabolic curve. (The aft edge needs to remain straight as it houses the luff for the mainsail). It sounds complicated but was fairly simple to achieve." Steve made a model to test his theory, and the image shows the profile.
Steve has the edge on most DIY boatbuilders as he is CADD (Computer Aided Design Drawing) literate and used his skills to design his parabolic curve.
"In the sketch, the line AB is the amount of taper from the hounds to the top of the mast," he explains. "Line CD is the length from hounds to mast-top. At B, draw a quadrant with radius AB and split it into equal segments, in this case eight. Similarly, break the line CD into eight equal sectors. Starting at the highest sector, project a horizontal line to meet the first vertical line (at C) then repeat for each line in the quadrant to successive vertical lines. If you link the intersection points as shown by the red line you will get a parabola."
"In a CADD system, it is quite easy to mirror the diagram and scale a section of the mast for each intersected point on the parabola," Steve says. The sketch shows a simplified version.
"From the CADD drawings of the sections, I determined the width of every strip at every sector line. I then built an assembly table (pictured with first strips being planed) that was perfectly flat and straight. I marked the widths onto pairs of strips and - with infinite patience - planed them to the parabolic curve with a spoke shave. From the same section drawings, I designed the supporting formers to aid assembly. These were CNC machined by a local specialist called Royal Wood."
A detail of the initial support formers to make the two mast halves, and the same former parts used to assemble the two halves into a single unit.
"I machined the convex and concave curves onto the edges of my strips with my router table," Steve says (the mast was 7.4 metres long). This meant he had to set up supports diagonally across the garden to get the length that he needed. The strips were then laid onto the formers (pictured pre-layup) and bonded with thickened WEST SYSTEM 105 Epoxy Resin with 206 Slow Hardener. The slower cure was necessary as the gluing had to be done 'at speed' to ensure that the shear web (cross-strengthening section) fitted perfectly into its bedding grooves before the epoxy set.
A close up of the formers and mast clamp in action.
"I had to add solid timber to take the screws for fitting," Steve says. "I found this quite tricky. The whole mast build took me to the limits of my ability."
The image above shows the strips in place along the whole length of the mast. The image below shows the fitting of the shear web (the two shaped inserts which act as load bearers) and the solid sections that will take the through-mast fittings and cleats. The forward compartments are completely watertight and will provide a degree of buoyancy in the event of a capsize.
"I glassed the inside of each half before assembly, and then the outside after the mast had been bonded together," Steve says. "I am very pleased with the result, but this was not a venture to be tackled on a whim."
For those who may be daunted by this part of the build, there are plenty of very nice aluminium masts that can be bought off the shelf. Steve's mast, however, adds some extra elegance to the design, and the raked and tapered parabolic shape should also add to its performance under sail.
To read about other interesting projects from Wessex Resins & Adhesives please visit epoxycraft.com or try these other build logs: