
West System epoxy used in building an 18th century Gajeta - Part 7
by Jake Kavanagh 29 Jul 2019 23:00 NZST
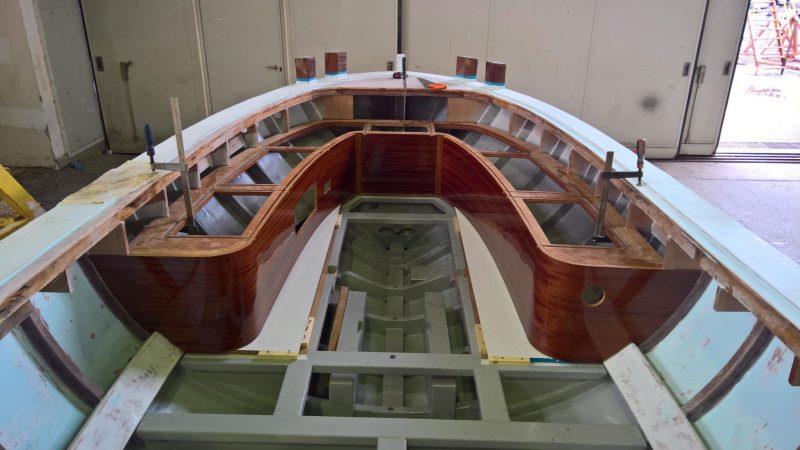
The locker base is bonded into position. Note the cut-outs for the instrument panel and exhaust © Wessex Resins & Adhesives
After several months of intense boatbuilding, the craftsmen at the Betina Shipyard in Croatia are in the final stages of the completing their experimental 7-metre traditional sailing gajeta. Now the emphasis shifts to vacuum forming the curved brightwork of the interior.
The beauty of using epoxy is that it forms a powerful adhesive, one that won't crack, warp or take up moisture. This makes it ideal for creating curved pieces from thin laminates of plywood, with the epoxy bonding the wood firmly into its new shape. It also forms an excellent seal over porous wood and makes a great base coat for subsequent layers of varnish.
The down side of cured unprotected clear epoxy is that it isn't particularly good at resisting ultraviolet radiation, although some additives can help. For wood that will be used for brightwork, i.e. to show a deep, rich natural colour as a gloss finish, then UV varnishes are required over the clear epoxy coating. As the Gajeta would be sailing competitively in the blazing sun of the Adriatic summer, it required the high gloss brightwork to be first sealed with several layers of epoxy (105 Resin with 207 Special Coating Hardener) and then overcoated with UV resistant varnish. But varnish always looks good - and lasts longest - when applied over curves rather than sharp edges, so soft (and steep) curves were prescribed for the Gajeta's interior fitout.
Designer Srdan Dokovic's original mission had been to prove that traditional build techniques could be married with ultra-modern production methods using CNC (computer numerical control) cutting. Using advanced design software he created the shape and look of a modernised fishing vessel seen in the graphic here. In addition, he wanted the finish to match that of a luxury production yacht.
To create some eye-catching lines within the hull, Srdan needed to introduce some sweeping interior curves. You can see from this image just what an effect they can have.
The best way to realise his vision was with some thin laminates of mahogany pulled into shape using a vacuum. Here's how the Betina craftsmen did it:
First you need a former, a jig to the dimensions and shape of the finished result. However, care has to be taken so only the outer layer of finished laminate is to the required measurement. This former has been made from cheap building ply cross braced with offcuts and will form the basis for the cockpit coaming.
This former, seen in use, was made for a section of the cockpit locker base and has a much sharper reverse curve. Note how clamped battens have been used to pull the thin (2-3mm) laminates down tight to assist the vacuum process.
Once built the former's frame is then coated with a thin layer of plywood that is gently forced down and secured to take the shape. This will create the base for the vacuum. It is deliberately cut wider than the frame so clamps can be attached to the protruding lip.
The marine grade mahogany ply is chosen for its surface pattern. Attempts are made to match the flow of the grain (pattern) as closely as possible between sheets. It is very unlikely this will be perfect but a close match is quite possible. One English boat builder (Freeman Boats) solved the problem by buying an entire tree for each interior fitout and making his own laminates in house. This guaranteed the grain, colour and texture of the wood (usually cherry or maple) was completely uniform throughout the whole boat.
With one layer of plastic below it, the laminates are coated with WEST SYSTEM® epoxy and then a thickened layer brushed on between each laminate. Once positioned carefully on the former, the vacuum bag is placed over the top. The area around the tightest curves is locked down with clamps before the vacuum is introduced. This pulls the laminates closely together as the epoxy cures. Unlike some wood glues, epoxies don't need air for the curing process.
Released from the former, the curves are now part of a solid shape. Here are the two halves of the cockpit coaming ready to be coated with three layers of WEST SYSTEM epoxy before being varnished.
The varnish is applied. Note how clean the workshop is. Ideally, the floor should be damp as well to hold down any dust but with the whole area vacuumed (and the painter in uncontaminated clothes) a good result can be achieved. For top results, varnish is applied in a positive-pressure spray booth using a spray gun.
In this image, the sections of the locker sides have been released, joined together and coated with epoxy. The team used WEST SYSTEM 105 Epoxy Resin with 207 Special Clear Hardener to achieve a rich gloss before a UV inhibiting two pack polyurethane varnish was applied over the top.
The locker base is bonded into position. Note the cut-outs for the instrument panel and exhaust. The exposed grain will need to be coated with epoxy to prevent moisture from penetrating the plywood laminates.
Brightwork and other detailing can be done whilst the main building work continues. Here the plywood decks are being fastened down and will be covered with WEST SYSTEM epoxy and reinforcement cloth to create a tough and fully waterproof structure. The design also specifies an attractive teak-laid foredeck.
A craftsman applies epoxy to the exposed grain of the deck plywood to ensure it is fully sealed. This preventative measure completely seals the plywood and creates a very stable and long-lived structure.
One of the two parallel mahogany rubbing strakes is attached. This is one of the few areas on the boat where metal screws have been used to tack the wood down onto a bed of thickened epoxy. If coated with silicone, they can be extracted later. You can see how the screw holes have been filled with epoxy. Note also that the gap between the strake and the stemhead has also been filled.
See more stories and tips at epoxycraft.com/category/blog