
West System epoxy used in building an 18th century Gajeta - Part 3
by Jake Kavanagh 12 Feb 2019 00:00 PST
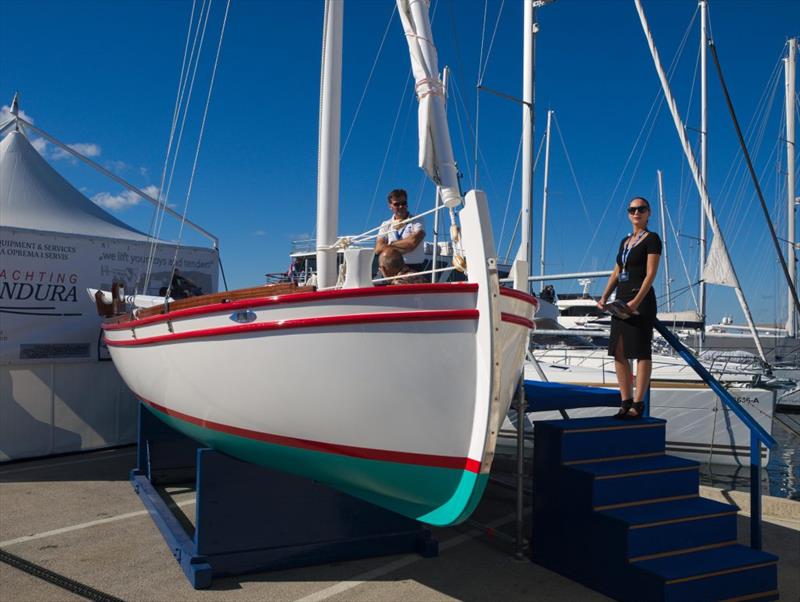
The finished Croatian Gajeta on display at a local boat show. She would later be raced in an annual regatta to prove the advantage of her lightweight construction © Wessex Resins & Adhesives
In a boatyard in Croatia, an 8-metre Croatian Gajeta is being built with a merger of new materials and traditional skills. At this stage of the project, it is ready to receive its first set of planks. To avoid using nails or screws in the build, everything will be held together with WEST SYSTEM epoxy.
(See part 1 and see part 2)
Part 3 - Base layer planking
Despite many hours of work, our traditionally-styled but otherwise ultra-modern Gajeta remains little more than a set of plywood formers. However, these have been used to make several parts of the kit that have been stored until needed later. In the last update, for example, we saw how the CNC (computer numerical control) cutter had shaped the various timbers for the frames, which were then laminated together to give solid pieces of hardwood with beautifully symmetrical shapes.
Now the builders at the Betina Shipyard can start to create the base layer of cedar batons, over which two thin layers of mahogany veneers will be attached in a double diagonal method of construction
The complete boat was bonded together with WEST SYSTEM® Epoxy, explains the projects designer, naval architect Srdan Dakovic. Once the planking was completed, it was sheathed in several layers of 300-gsm biaxial cloth. The idea was that this boat wouldnt have a single metal screw in its basic construction, although stainless steel staples were used for the double diagonal. Long-lived and corrosion-free epoxy would ensure a much lighter and stronger boat.
However, before it could be sheathed, the team had to make a stable hull shape. They began with the cedar strip planking that would provide a strong base layer.
Sitting astride the upturned jig, a worker begins to fix the guide batons into place. Note how he is using offcuts to ensure the correct positioning. There will be five batons between each of the guides from keel to gunwale.
With the positions identified, now the rest of the guide batons can be attached to the plywood formers underneath. Note how the formers have plastic along the edges to allow for easy release of the finished hull.
The guide batons have allowed the boatbuilders to mark the positions of each strip and to cut them to length. The batons, made of cedar, are all identical in width and depth and are glued to each other on both sides using WEST SYSTEM Epoxy thickened with 406 Colloidal Silica. The plastic-covered glue table is in the foreground, where the strips are moved from the trestles beside it for application of the thickened epoxy.
The hull takes shape, with the batons held in place with screws through washers. To ensure easy release, the screws are first sprayed with a fine mist of vegetable oil. Once the epoxy has hardened all the screws and washers are withdrawn so no fastenings are left behind. Note how the planks from one side overlap those of the other. They will be trimmed back later.
As the planking advances, a template of the outer keel is offered up to ensure the shape is correct. The outer keel has already been made in sections by the CNC machine and is sourced from strips of solid mahogany that have been assembled into a rough shape before the final cut and trim. You can just see the laminated structure in the picture. Note also the shallow angle of the scarf joints along the base.
Both sides of the hull join at the keel. The first rows of screws are in the process of being removed and the hull sanded to abrade back any squeezed-out epoxy.
The beauty of epoxy is that unlike polyester resin (fibreglass) there is virtually no shrinkage or distortion as the epoxy cures. The cedar strip hull shape is now resting on the inner keel and plywood formers under its own weight.
Time to assemble the outer keel, but first it has to be checked for a good fit. Here you can see the three sections positioned together on the floor beside the hull. Note also a strip of mahogany draped over the chine (curve of the underwater hull) and being checked for the correct width and angle.
A perfect fit hardly surprising really due to the accuracy of the CNC process. The build time is also greatly reduced as components arrive pre-shaped, with very little remedial work needed for them to drop into place. It all goes together like a giant Lego kit, Srdan reminds us.
A view from aft. The screw removal process is now well underway and the sanding will continue to ensure this base layer of strips is as smooth as possible. The hundreds of screw holes and any gaps in the planking will soon be filled with epoxy from the first layer of mahogany overlay. You can see another view of the test strip being offered up, with marker pen lines to ensure the rest lie the same way.
Next time: Putting down the double diagonal planks and getting ready for epoxy sheathing.
See more stories and tips at: epoxycraft.com/category/blog