Use This Sailing Safety Tool in a Flooding Emergency!
by John Jamieson on 25 Jan 2013
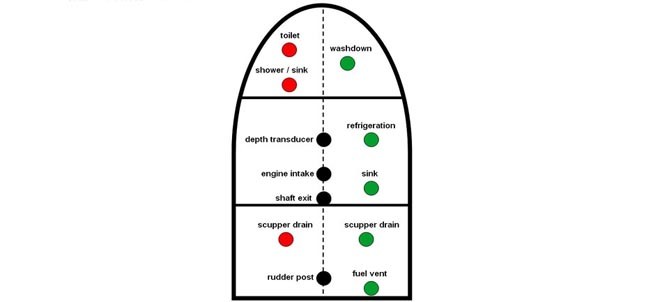
Make a simple seacock diagram. Divide the hull into thirds lengthwise to represent the forward cabin, main cabin, and cockpit/stern area. Place a dotted line down the middle to represent the centreline. SW
The average sailing boat could have eight to twelve holes drilled below the waterline. These 'through-hulls' are used for heads, sink and shower drains, cockpit scupper drains, engine intake, instrument transducers, shaft exits and the rudder post. Each could be the source of a catastrophic ingress of water if they are not maintained. If the worst does happen, knowing precisely where they are and how to fix the problem quickly could save your boat.
Follow these easy steps to make sure your through-hulls do their job for peace-of-mind at the dock, at anchor, or when you're underway.
How to Avoid the Danger of Flooding
Most through-hulls are covered by a valve--called seacocks--with a handle that can be opened to allow sea water into the boat or shut to keep sea water out. Seacocks are the most important components beneath the waterline and need attention and care to prevent flooding. Check every handle on every seacock on every through-hull. Surveyors report time and again that they find frozen sea-cock handles on most every boat they inspect. You must be able to close any seacock with minimum effort.
Move the handle from open position (parallel to the hose) to closed position (perpendicular to the hose) and back to open. This exercises the seacock handle to keep corrosion at bay, and the handle lubricated. Open frozen seacock handles with a light tap from a hammer or mallet.
Examine the hoses at the top of each seacock. Replace hardened or cracked hoses right away. They are the number one cause of through-hull failure. Inspect the stainless clamps on each seacock hose. Replace rusted or corroded clamps. Double-clamp hoses on each side of a device or fitting. This adds extra security and peace-of-mind.
Insure that a tapered wooden plug gets lashed to the base of the seacock with easy-to-break twine. If a seacock hose fails, you can drive the plug into the seacock hole with a hammer or mallet as a temporary repair.
Mount a hammer or mallet nearby in brackets in a conspicuous location in the main cabin. Paint the handle day-glow orange or red. Add reflective tape strips to make it visible to a flashlight on the blackest night. Brief your sailing crew or partner. Instant accessibility could make a difference in keeping your boat afloat.
Inspect, clean, and lubricate every seacock once a year when you haul your boat. This gives you the perfect opportunity to find and fix problems. That way, you will have peace-of-mind that all of your through-hulls are in great shape for another sailing season.
Make a Simple Seacock Diagram
Make a Seacock Diagram for your boat (see illustration). You need to do this just once. If you add additional through hulls in the future, update your diagram. Post the completed diagram in the cabin so that all hands can see it.
Make another copy and insert it into your ship's papers notebook or briefcase. Spend a few minutes to go over the diagram with your crew so that they can locate any seacock aboard your boat within seconds.
1. Attach a piece of paper to a clipboard. Draw an outline of a hull (see illustration). Divide the diagram lengthwise into thirds as shown. These represent the forward cabin, main cabin, and cockpit/stern area. Make a dotted line down the center of the diagram from bow to stern to represent your boat's centreline. Strap a rubber band near the bottom of the clipboard to hold your diagram in place. Grab a pencil.
2. Start in the forward third of your boat (forward of the main cabin). Remove lockers, lids, or access covers to locate each seacock.
3. Plot small circles onto the diagram to indicate each seacock. Label each circle (head, shower, washdown hose, etc …) Note the dotted line down the centreline of the diagram. Seacocks should be plotted to the left, right, or along the centreline for faster access. Color code if desired (see illustration).
4. Include bilge cover plates. These can be difficult to locate in trying conditions because fine joinery work can make seams almost invisible.
5. Move to the midships section (main cabin); then to the aft section (cockpit and stern). Repeat the process. Print a second copy of the insert. Transfer your rough sketch onto the new insert so that it's neat and legible. Post it where all hands can see it day or night.
Note that not all through-hulls are covered by sea cocks. Include these locations on your diagram: shaft exit (where the propeller shaft exits the hull), rudder post location, fuel and water vents.
Use these easy sailing tips to keep your boat's 'gates to the sea' working to perfection--wherever in the world you choose to cruise!
John Jamieson (Captain John) with 25+ years of experience shows you the no-nonsense cruising skills you need for safer sailing worldwide. Visit his website at www.skippertips.com. Sign up for the Free, highly popular weekly 'Captain John's Sailing Tip-of-the-Week'. Discover how you can gain instant access to hundreds of sailing articles, videos, and e-Books!
If you want to link to this article then please use this URL: www.sail-world.com/105873